

How To Install Macos Mojave Hackintosh
The following guide is a complete walkthrough for updating to or installing a fresh version of macOS Mojave. It requires no feel and all of the bones installation and mail service-installation tools are available on tonymacx86.com.
Table of Contents
 Step i: Download macOS Mojave
![]()
Step 2: Create a Bootable USB with UniBeast
![]()
Step 3: Recommended BIOS Settings
 Step 4: Install macOS Mojave
 Footstep 5: Post Installation with MultiBeast

Troubleshooting and Optimizations
Before You Begin
1. Register here at tonymacx86! If you don't have a user account, create ane!
2. Get our latest UniBeast and MultiBeast tools from the downloads section.
3. Purchase a 16GB or larger USB drive.
4. Exercise a total backup of your organization. We strongly recommend performing a full backup of your existing organization using Carbon Copy Cloner. Past doing this, you can always get back to your working installation.
UniBeast is a tool that creates a bootable installer out of your downloaded version of macOS. In order to outset fresh, you lot'll demand access to a functional computer running OS X Lion 10.seven.5 or later. This is a requirement, equally you need admission to the Mac App Store to download macOS and create the installation bulldoze. To first from scratch, booting the 10.6 Snow Leopard Retail DVD directly, check out iBoot + MultiBeast.
Existing Clover users may do a direct update to macOS Mojave by simply running the Install macOS Mojave app as normal Mac users would. Follow these steps: Update Directly to macOS Mojave.

STEP 1: Download macOS Mojave
The full operating system is a free download for anyone who has purchased Mac OS X Snow Leopard, Lion, or Mountain Lion or has a Mac preloaded with Os X Mavericks, Yosemite, El Capitan, macOS Sierra, or macOS High Sierra.
Download the Application from the Mac App Store using your Apple tree ID on any of these specific Macs:.
- MacBook (Early on 2022 or newer)
- MacBook Air (Mid 2022 or newer)
- MacBook Pro (Mid 2022 or newer)
- Mac mini (Late 2022 or newer)
- iMac (Late 2022 or newer)
- iMac Pro (2017)
- Mac Pro (Late 2022, plus mid-2010 and mid-2012 models with recommended Metal-capable GPU)
i. Open Mac App Store
2. Log in with your Apple ID
3. Download macOS Mojave
The Application Install macOS Mojave will appear in /Applications.
Step ii: Create a Bootable USB Drive with UniBeast
Have a deep jiff and accept your fourth dimension- this is pretty unproblematic, but information technology'southward easy to miss things if yous rush. Follow each step to the letter.
1. Insert the USB bulldoze
ii. Open /Applications/Utilities/Disk Utility
iii. Highlight the USB drive in left column
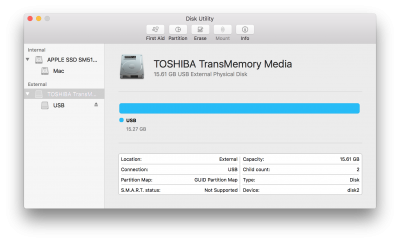
4. Click Erase button
5. For Name: type USB (You tin rename it later on)
6. For Format: cull Mac Bone Extended (Journaled)
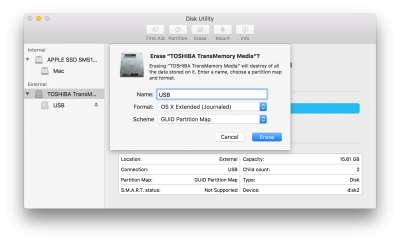
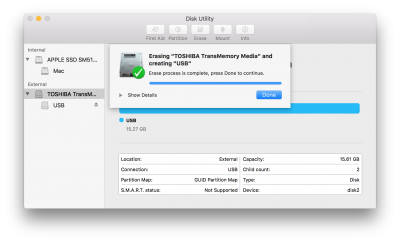
seven. Click Erase then Done
8. Download and run UniBeast
9. Click Continue, Continue, Go along, Go along, Agree
ten. At Destination Select, choose USB and click Continue

11. At Select OS Installation screen choose Mojave and click Go on
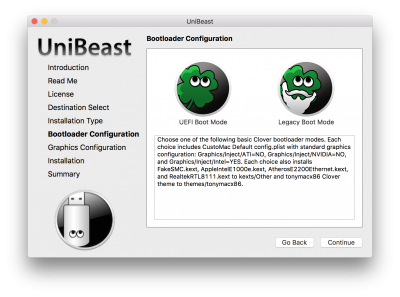
12. At Bootloader Options screen choose UEFI Boot Mode or Legacy Boot Fashion. UEFI Boot Mode is recommended for 7/8/9/100/200/300 Series CustoMac desktops and all UEFI capable systems. Legacy Kicking Style is recommended for 5/6 Series CustoMac desktops and all BIOS based systems.
thirteen. (Optional) At Graphics Configuration screen choose the appropriate graphics option for your organization and click Continue.
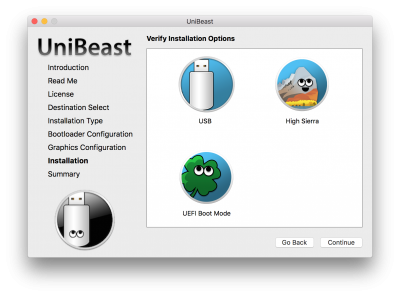
xiv. Verify installation options, then click Continue, enter countersign and click Install
UniBeast will now create the bootable USB bulldoze. The process volition simply accept most ten minutes, depending on system and bulldoze speed. Practise not unplug or stop during this time.

15. Drag MultiBeast to your completed USB bulldoze.
Clover Annotation: UniBeast delivers basic bootloader back up based on our testing on recommended CustoMac systems. For further bootloader customization, download and run the official Clover bundle. Advanced users may also compile Clover by downloading the full source.
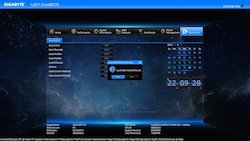
STEP three: Recommended BIOS Settings
If you lot're installing on a recommended CustoMac desktop with AMI UEFI BIOS, the options are simple. For other systems make certain to set your BIOS to Optimized Defaults, and your hard bulldoze to AHCI mode. Here are standard AMI UEFI BIOS settings for
Gigabyte AMI UEFI BIOS, Gigabyte Accolade BIOS, ASUS AMI UEFI BIOS, and MSI AMI UEFI BIOS.
1. To access BIOS/UEFI Setup, press and concur Delete on a USB Keyboard while the system is booting up
2. Load Optimized Defaults
3. If your CPU supports VT-d, disable information technology
iv. If your arrangement has CFG-Lock, disable it
v. If your organization has Secure Kick Style, disable it
vi. Set Os Blazon to Other Bone
vii. If your organization has IO Serial Port, disable it
8. Fix XHCI Handoff to Enabled
9. If y'all accept a 6 series or x58 system with Honour BIOS, disable USB 3.0
10. Save and exit.

Step four: Install macOS Mojave
Yous're almost done! All you need to practice is boot from the USB drive and install! For all-time results, insert the USB in a USB ii.0 port.
1. Turn on the computer
2. Press the hotkey to cull kick device (F12 for Gigabyte motherboards, F8 for ASUS motherboards, F11 for ASrock motherboards)
3. Cull USB
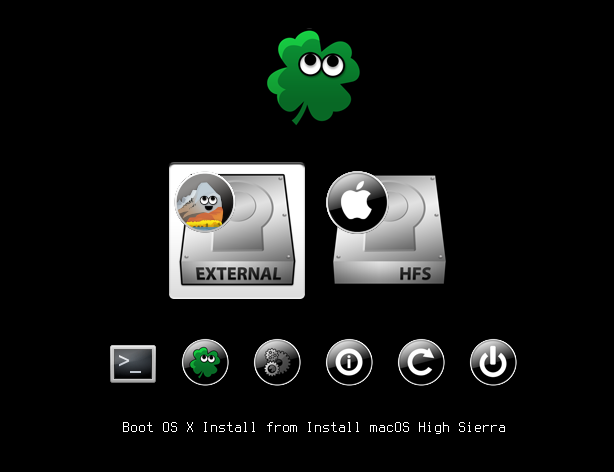
iv. At Clover kick screen, choose Boot Bone X Install from Install macOS Mojave
5. When you make it at the Installer, cull language.
If you accept issues reaching the installer, you can employ spacebar on boot screen to enter alternate boot modes such equally verbose and safe style. For more instructions on inbound boot flags run into Clover Basics and Switching Communication.
6. For a new installation of macOS, you MUST erase and format the destination bulldoze according to the following steps before continuing.
a. In the top menu bar choose Utilities, and open Deejay Utility
b. Highlight your target drive for the Mojave installation in left cavalcade.
c. Click Erase button
d. For Proper name: blazon Mojave (You tin can rename information technology later)
e. For Format: choose Mac OS Extended (Journaled)
f. Click Erase
g. Close Deejay Utility
vii. When the installer asks you where to install, choose Mojave
8. Upon completion, the system will automatically restart.
9. Press the hotkey to choose boot device (F12 for Gigabyte motherboards, F8 for ASUS motherboards, F11 for ASrock motherboards)
10. Cull USB
eleven. At the Kicking Screen, choose Mojave
12. Complete macOS installation. The system will automatically reboot.

Stride five: Postal service Installation with MultiBeast
MultiBeast is an all-in-one mail-installation tool designed to enable boot from difficult drive, and install back up for Audio, Network, and Graphics. The installation is complete, but the bulldoze isn't bootable yet. Boot from the USB again, this time choosing Mojave.
Note: MultiBeast 11 will be prepare before long- for now apply MultiBeast 10.4.0 for Post-Installation.
1. Press the hotkey to choose boot device (F12 for Gigabyte motherboards, F8 for ASUS motherboards, F11 for ASrock motherboards)
2. Cull USB
3. At the Boot Screen, choose your new Mojave installation.
4. Complete macOS setup
5. Open and run MultiBeast

six. If this is a fresh installation, click Quick Start. UEFI Boot Manner is recommended for 7/eight/9/100/200/300 Series CustoMac desktops and all UEFI capable systems. Legacy Boot Fashion is recommended for 5/6 Series CustoMac desktops and all BIOS based systems.

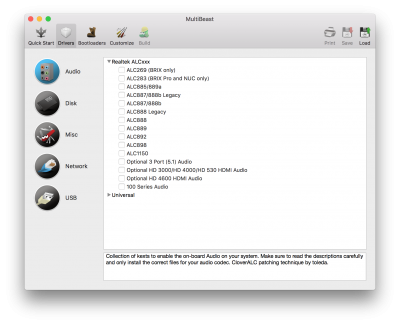
7. Cull the advisable sound and network options for your system:
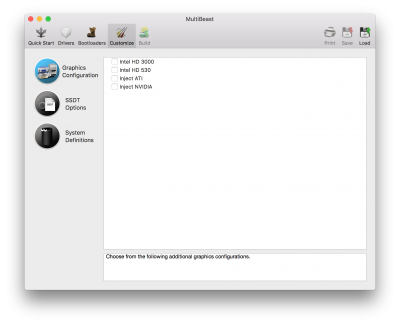
8. Click Customize for further options
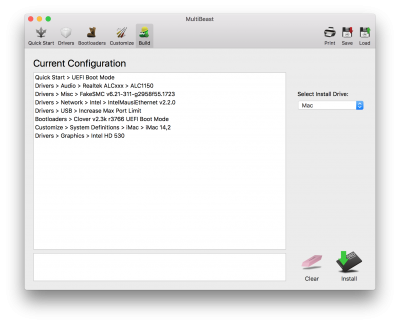
9. Click Print or Save to back up your configuration
10. Click Build then Install
If using a GeForce GTX 1050, 1050 Ti, 1060, 1070, 1070 Ti, 1080, 1080 Ti, TITAN Pascal, and TITAN Xp 'Pascal' graphics carte du jour or NVIDIA GeForce GTX 750, 750 Ti, 950, 960, 970, 980, 980 Ti, and TITAN Ten 'Maxwell' graphics card, macOS Mojave graphics drivers are non natively supported. Alternating NVIDIA drivers are required.
Note: Alternate NVIDIA Graphics Drivers are not available withal- if you have a Maxwell or Pascal based NVIDIA bill of fare, stay on High Sierra for now.
11. (Optional) Download and install Alternate NVIDIA Graphics Drivers
12. Reboot
Yay! You at present have a fully updated bootable version of macOS Mojave on your CustoMac! And a super handy USB rescue drive. Information technology's easy to become frustrated, simply don't requite up! If you get stuck, at that place are many users with similar hardware in the tonymacx86 Forum to provide back up.
Thanks to all of the hard working developers, hackers, and testers all over the world without whom this guide would never take been possible.

Troubleshooting and Optimizations:
Subsequently yous've completed the guide, things such as HDMI audio and iMessage may not work automatically. The list below should serve to fully optimize your system subsequently initial setup.
[README] Common Problems/Changes/Fixes on Mojave
Mojave AppleHDA Sound]
Update Straight to MacOS Mojave
[Guide] Intel Framebuffer patching using WhateverGreen
Solving NVIDIA Driver Install & Loading Bug
An iDiot's Guide To Lilu and its Plug-ins
An iDiot'southward Guide To iMessage
macOS Native CPU/IGPU Power Management
This list will be updated.
Alternate NVIDIA Graphics Drivers
NVIDIA releases alternate graphics drivers separately on the web for each build of macOS. These are different from the drivers Apple ships equally standard, and should be considered experimental. In the by, the drivers have been known to solve OpenCL issues with certain applications, also as providing improve native GPU power management for certain devices. These drivers are currently the only method to get full acceleration for GeForce GTX 1050, 1050 Ti, 1060, 1070, 1070 Ti, 1080, 1080 Ti, TITAN Pascal, and TITAN Xp 'Pascal' graphics cards and NVIDIA GeForce GTX 750, 750 Ti, 950, 960, 970, 980, 980 Ti, and TITAN X 'Maxwell' graphics cards. There are no current Macs with these cards, so support is absent natively in macOS.
Note: Alternate NVIDIA Graphics Drivers are not available all the same- if y'all have a Maxwell or Pascal based NVIDIA carte du jour, stay on High Sierra for now.
Clover Bootloader Credits
UniBeast contains and delivers files from the Clover EFI Bootloader project. For more than information and sources used see Clover EFI bootloader. Clover v2 is open source based on different projects: Clover, rEFIt, XNU, VirtualBox. The chief is EDK2 latest revision.
Clover Annotation: UniBeast delivers basic bootloader back up based on our testing on recommended CustoMac systems. For further bootloader customization, download and run the official Clover packet. Avant-garde users may also compile Clover by downloading the full source.
Clover Developers:
Slice, with assistance of Kabyl, usr-sse2, jadran, Blackosx, dmazar, STLVNUB, pcj, apianti, JrCs, pene, FrodoKenny, skoczy, ycr.ru, Oscar09, xsmile, SoThOr, rehabman…
Source code credits:
Intel, Apple, Oracle, Chameleon, rEFIt and Xom.
Clover Source and Downloads:
Sourceforge: Clover

Source: https://www.tonymacx86.com/threads/unibeast-install-macos-mojave-on-any-supported-intel-based-pc.259381/
Posted by: harrisagover.blogspot.com
0 Response to "How To Install Macos Mojave Hackintosh"
Post a Comment